<!DOCTYPE html>
<html>
<head>
<title>Page Title</title>
</head>
<style>
/*부모의 font-size가 변경되면 자식요소에도 영향을 미친다.*/
.jb-default-1{font-size: 15px;}
.jb-default-2{font-size: 32px;}
.jb-smaller{font-size: smaller;}
.jb-larger{font-size: larger;}
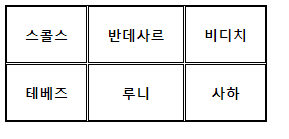
/*6. 그림처럼 스타일을 적용하시오. (적용색상: gray)*/
</style>
<body>
<p class="jn-default-1">
<span>스콜스</span>
<span class="jb-smaller">반데사르</span>
<span class="jb-larger">비디치</span>
</p>
<p class="jn-default-2">
<span>스콜스</span>
<span class="jb-smaller">반데사르</span>
<span class="jb-larger">비디치</span>
</p>
</body>
</html>
--------------------
<!DOCTYPE html>
<html>
<head>
<title>Page Title</title>
</head>
<style>
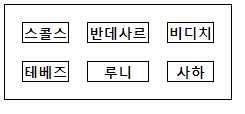
/*table 예제
table{
border: 1px solid black;
}
th, td{
border: 1px solid black;
padding: 20px;
}
tr:nth-child(2n+3){ // 3번째 줄부터 빨간색 적용. 3은 시작점.
background-color: red;
}*/
table,th,td{
border: 1px solid black;
border-spacing: 20px 20px;
}
</style>
<body>
<table>
<tr>
<th>스콜스</th>
<th>반데사르</th>
<th>비디치</th>
</tr>
<tr>
<th>테베즈</th>
<th>루니</th>
<th>사하</th>
</tr>
</table>
</body>
</html>
--------------------
<!DOCTYPE html>
<html>
<head>
<title>Page Title</title>
</head>
<style>
/*Form 예제 - input */
input[type=text]{
border: 2px solid red;
border-radius: 4px;
}
input[type=text]{
background-color: #3CBC8D;
color: white;
}
/*Form 예제 - Select menu */
select{
width:100%;
padding: 16px 20px;
border: none;
border-radius: 4px;
background-color: #f1f1f1;
}
</style>
<body>
<form>
<label for="fname">드</label>
<input type="text" id="fname" name="fname">
<label for="lname">멘</label>
<input type="text" id="lname" name="lname">
<select id="country" name="country">
<option value="KO">한국</option>
<option value="USA">미국</option>
<option value="JPN">일본</option>
</form>
</body>
</html>
--------------------
<!DOCTYPE html>
<html>
<head>
<title>Page Title</title>
</head>
<style>
/*Form 예제3 */
input[type=text], select{
width: 100%;
padding: 12px 20px;
margin: 8px 0;
display: inline-block;
border: 2px solid red;
border-radius: 4px;
box-sizing: border-box;
}
input[type=submit]{
width: 100%;
background-color: #4CAF50;
color: white;
padding: 14px 20px;
margin: 8px 0;
border: none;
border-radius: 4px;
cursor: pointer; // 커서가져가면 손바닥모양으로 바뀜.
}
input[type=submuit]hover{
background-color: #45a049;
}
div{
border-radius: 5px;
background-color: #f2f2f2;
padding: 20px;
}
</style>
<body>
<form action="/chelsea.norwichgo">
<label for="fname">드</label>
<input type="text" id="fname" name="fname" placeholder="록바"> // placeholder : 클릭하면 없어지는 값.
<label for="lname">멘</label>
<input type="text" id="lname" name="lname" placeholder="아멘">
<select id="country" name="country">
<option value="KO">한국</option>
<option value="USA">미국</option>
<option value="JPN">일본</option>
</select>
<input type="submit" value="submit">
</form>
</body>
</html>
--------------------
<!DOCTYPE html>
<html>
<head>
<meta charset="UTF-8">
<style>
input[type=text]{
width: 100%;
box-sizing: border-box;
border: 2px solid #ccc;
border-radius: 4px;
font-size: 16px;
background-color: white;
background-image: url('search-icon.png');
background-poistion: 10px 10px;
background-repeat: no-repeat;
padding: 12px 20px 12px 40px;
}
textarea{
width: 100%;
height: 150px;
box-sizing: border-box;
border: 2px solid #ccc;
border-radius: 4px;
font-size: 16px;
background-color: #f8f8f8;
padding: 12px 20px;
}
</style>
<title>검색창</title>
</head>
<body>
<form>
<input type="text" name="search" placeholder="Search...">
<textarea rows="100" cols="100" placeholder="입력해랏"></textarea>
</form>
</body>
</html>
--------------------
<!DOCTYPE html>
<html>
<head>
<style>
/*1.CSS - table예제1 아래그림처럼 스타일을 적용하시오*/
table, th, tr, td{
border: 3px solid gray;
border-collapse : collapse;
}
th{
width: 200px;
text-align: center;
}
td{
height: 70px;
vertical-align: bottom;
}
</style>
</head>
<body>
<h2>The vertical-alignProperty</h2>
<p>This property sets thevertical alignment (like top, bottom, or middle) of the content in th or td.</p>
<table>
<tr>
<th>Firstname</th>
<th>Lastname</th>
<th>Savings</th>
</tr>
<tr>
<td>Peter</td>
<td>Griffin</td>
<td>$100</td>
</tr>
<tr>
<td>Lois</td>
<td>Griffin</td>
<td>$150</td>
</tr>
<tr>
<td>Joe</td>
<td>Swanson</td>
<td>$300</td>
</tr>
<tr>
<td>Cleveland</td>
<td>Brown</td>
<td>$250</td>
</tr>
</table>
</body>
</html>
--------------------
<!DOCTYPE html>
<html>
<head>
<style>
/*2.CSS - table예제2 아래그림처럼 스타일을 적용하시오
*/
table, th, tr{
border: 3px transparent gray;
border-collapse : collapse;
}
th{
width: 200px;
text-align: left; // th는 정렬안해도 자동 가운데 정렬임(td는 자동 왼쪽정렬)
}
tr:nth-child(2n){ // nth! 이다.!!!!!!!!!!! ntn으로 헷갈림
background-color: lightgray;
}
</style>
</head>
<body>
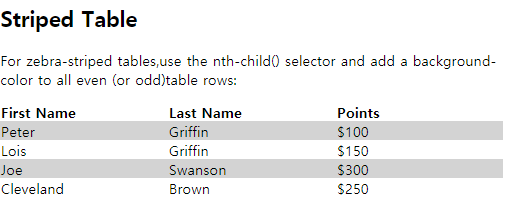
<h2>Striped Table</h2>
<p>For zebra-striped tables,use the nth-child() selector and add a background-color to all even (or odd)table rows:</p>
<table>
<tr>
<th>First Name</th>
<th>Last Name</th>
<th>Points</th>
</tr>
<tr>
<td>Peter</td>
<td>Griffin</td>
<td>$100</td>
</tr>
<tr>
<td>Lois</td>
<td>Griffin</td>
<td>$150</td>
</tr>
<tr>
<td>Joe</td>
<td>Swanson</td>
<td>$300</td>
</tr>
<tr>
<td>Cleveland</td>
<td>Brown</td>
<td>$250</td>
</tr>
</table>
</body>
</html>
--------------------
<!DOCTYPE html>
<html>
<head>
<style>
/*3.CSS - table예제3 아래 그림처럼 스타일을 적용하시오. (적용색상: #f2f2f2, #4CAF50)*/
table, th, tr{
border: 3px transparent gray;
border-collapse : collapse;
}
th{
width: 200px;
text-align: left;
background-color: #4CAF50;
color: white;
}
tr:nth-child(2n){
background-color: #f2f2f2;
}
td{
font-weight: bold;
}
</style>
</head>
<body>
<h2>Colored TableHeader</h2>
<table>
<tr>
<th>Firstname</th>
<th>Lastname</th>
<th>Savings</th>
</tr>
<tr>
<td>Peter</td>
<td>Griffin</td>
<td>$100</td>
</tr>
<tr>
<td>Lois</td>
<td>Griffin</td>
<td>$150</td>
</tr>
<tr>
<td>Joe</td>
<td>Swanson</td>
<td>$300</td>
</tr>
<tr>
<td>Cleveland</td>
<td>Brown</td>
<td>$250</td>
</tr>
</table>
</body>
</html>
--------------------
<!DOCTYPE html>
<html>
<head>
<style>
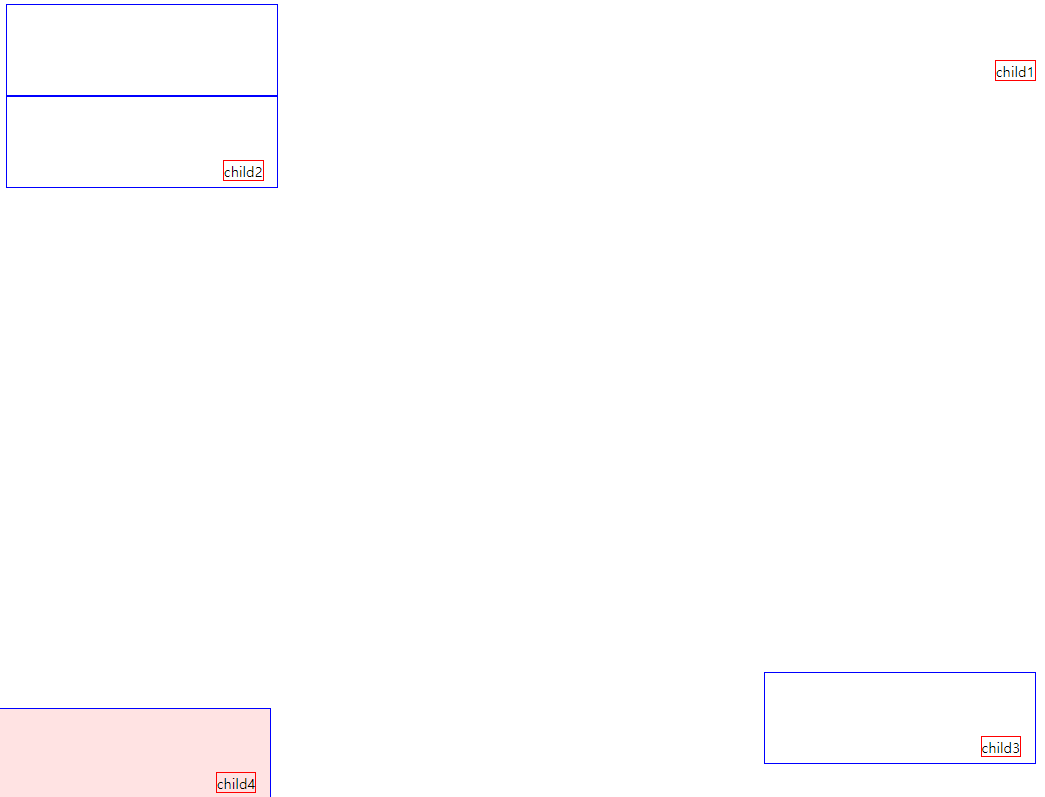
/*CSS 스타일 속성 - 위치 속성
position : 요소에 사용되는 위치지정방법의 유형을 지정
*/
#parent1{
position: static;
border: 1px solid blue;
width: 300px;
height: 100px;
}
#child1{
position: absolute;
border: 1px solid red;
top: 70px;
right: 15px;
}
#parent2{
position: relative;
border: 1px solid blue;
width: 300px;
height: 100px;
}
#child2{
position: absolute;
border: 1px solid red;
top: 70px;
right: 15px;
}
#parent3{
position: absolute;
border: 1px solid blue;
width: 300px;
height: 100px;
top: 750px;
right: 15px;
}
#child3{
position: absolute;
border: 1px solid red;
top: 70px;
right: 15px;
}
#parent4{
position: fixed;
border: 1px solid blue;
background-color: rgba(255,200,200,0.5);
width: 300px;
height: 100px;
bottom: 0;
left: 0;
right: 0;
}
#child4{
position: absolute;
border: 1px solid red;
top: 70px;
right: 15px;
}
</style>
</head>
<body>
<div id='parent1'>
<div id='child1'>
child1
</div>
</div>
<div id='parent2'>
<div id='child2'>
child2
</div>
</div>
<div id='parent3'>
<div id='child3'>
child3
</div>
</div>
<div id='parent4'>
<div id='child4'>
child4
</div>
</div>
</body>
</html>
--------------------
<!DOCTYPE html>
<html>
<head>
<style>
/*CSS 스타일 속성 - 위치 속성
position 예제2
*/
span, div {
background: yellow;
border: 1px solid red;
}
.top {
position: relative;
top: 5px;
z-index: 1;
}
.right {
position: relative;
right: 5px;
}
.bottom {
position: relative;
bottom: 5px;
}
.left {
position: relative;
left: 5px;
}
</style>
</head>
<body>
<span class="top">top</span>
<span class="right">right</span>
<span class="bottom">bottom</span>
<div class="left">left</div>
</body>
</html>
--------------------
<!DOCTYPE html>
<html>
<head>
<style>
/*CSS 스타일 속성 - 위치 속성과 관련된 공식
*/
.box{
width: 100px;
height: 100px;
position: absolute;
}
.box:nth-child(1){
background-color: red;
left: 10px;
top: 10px;
z-index: 100;
}
.box:nth-child(2){
background-color: green;
left: 50px;
top: 50px;
z-index: 10;
}
.box:nth-child(3){
background-color: blue;
left: 90px;
top: 90px;
z-index: 1; // 여러 인덱스 있을경우 제일 앞에 나타남.
}
body > div{
width: 400px;
height: 100px;
border: 3px solid black;
position: relative;
}
</style>
</head>
<body>
<h1>위 고우 노리치</h1>
<div>
<div class="box"></div>
<div class="box"></div>
<div class="box"></div>
</div>
<h1>훔바<br>훔바</h1>
</body>
</html>
--------------------
<!DOCTYPE html>
<html>
<head>
<style>
/*CSS 예제 - float?*/
* {
box-sizing: border-box;
}
.header, .footer {
background-color: grey;
color: white;
padding: 15px;
}
.column {
float: left;
padding: 15px;
}
.clearfix::after {
content:"";
clear: both;
display: table;
}
.menu {
width: 25%;
}
.content {
width: 75%;
}
.columnmenu ul {
list-style-type: none;
margin: 0;
padding: 0;
}
.columnmenu li {
padding: 8px;
margin-bottom: 8px;
background-color: #33b5e5;
color: #ffffff;
}
.columnmenu li:hover {
background-color: #0099cc;
}
</style>
</head>
<body>
<div class="header">
<h1>Chania</h1>
</div>
<div class="clearfix">
<div class="columnmenu">
<ul>
<li>The Flight</li>
<li>The City</li>
<li>The Island</li>
<li>The Food</li>
</ul>
</div>
<div class="columncontent">
<h1>The City</h1>
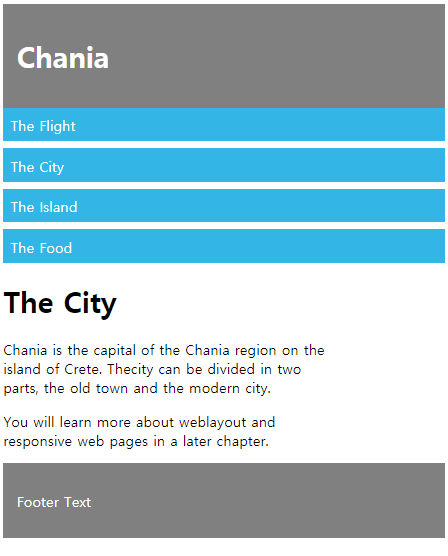
<p>Chania is the capital of the Chania region on the island of Crete. Thecity can be divided in two parts, the old town and the modern city.</p>
<p>You will learn more about weblayout and responsive web pages in a later chapter.</p>
</div>
</div>
<div class="footer">
<p>Footer Text</p>
</div>
</body>
</html>